Working with Rooms
Please select the type of Outlook you use for the appropriate walkthrough.
Outlook for PC
In this article [jump to a section]:
What is a room?
A room is a shared resource meant for many people to access the same information, primarily the calendar of a conference room or other meeting space. It is similar to a shared mailbox, but with key differences. Whereas a shared calendar is usually only visible to a specific team, a room calendar is generally open to anyone. Events are placed directly, or “live” on a shared calendar, whereas a room is used as the location for an event, but the event “lives” on the meeting organizer’s calendar.
Room calendars also include booking options, which can range from an automatic reply with information about the room, to approving or rejecting meetings based on availability or time of day.
How do I book a room?
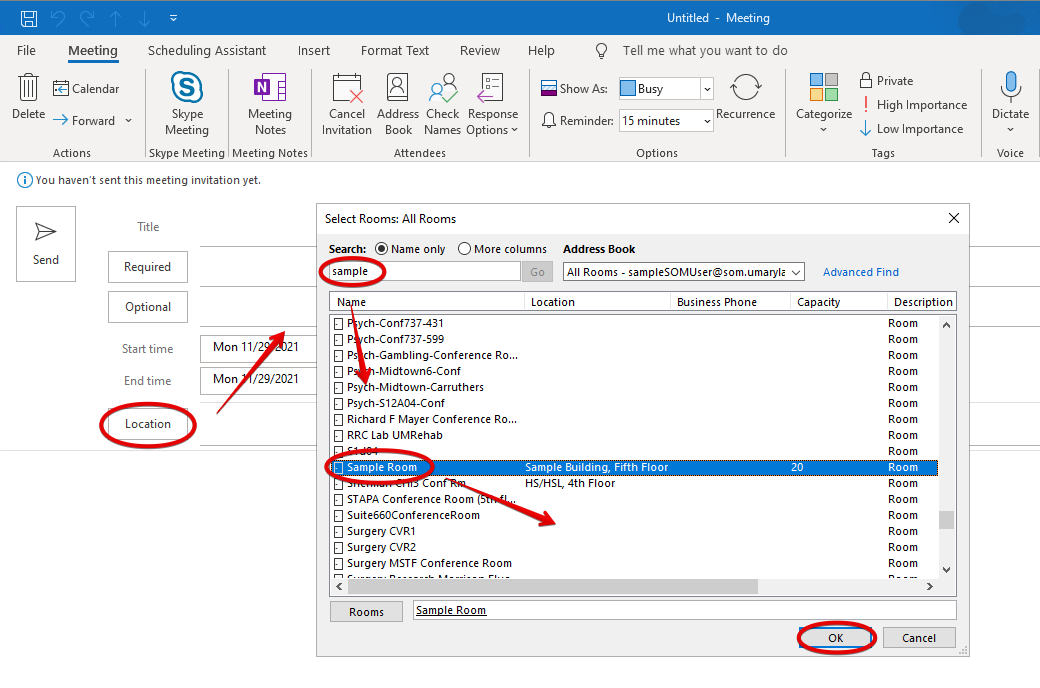
Create a new meeting. Go to Location > Search for your room > Double click it > OK.
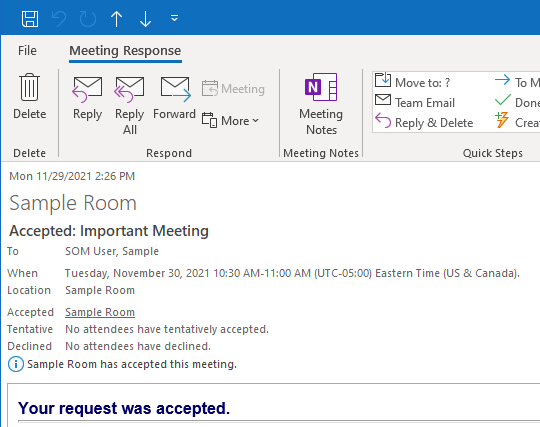
By default, rooms are set to automatically accept any request. Within moments, you should receive an email like this.
How do I check a room’s availability?
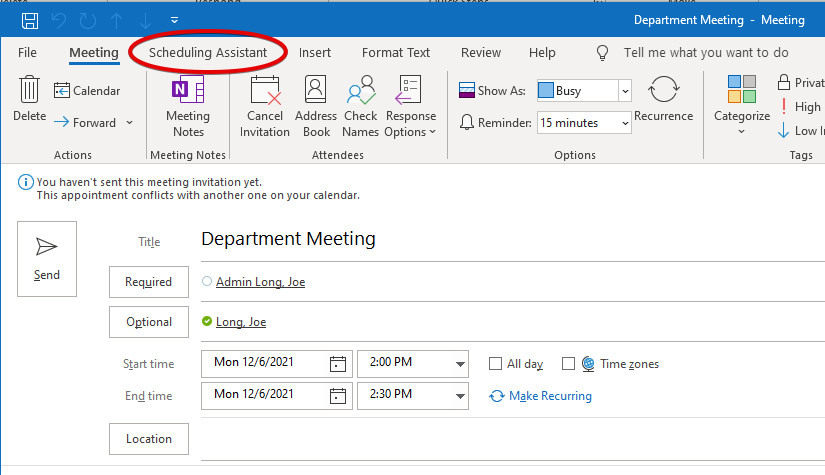
The best way to check a room’s availability is with the Scheduling Assistant. Create a new meeting in Outlook. Fill in the title, time and participants if you wish, though you can do this later. Click on Scheduling Assistant in the top menu.
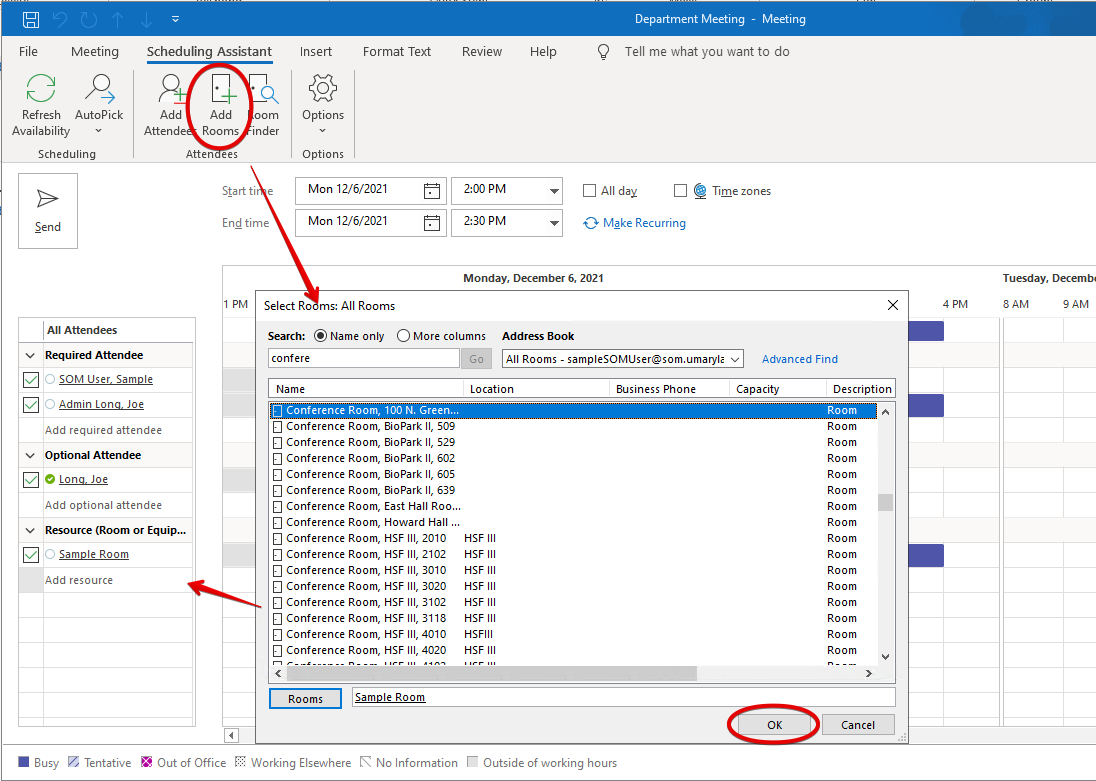
Now you’ll see a chart, including a list of any attendees you included already. You can also add more. To add rooms, click Add Rooms in the top menu. A list of all rooms on campus will appear. You can select multiple rooms to see their availability and choose the best one for your event.
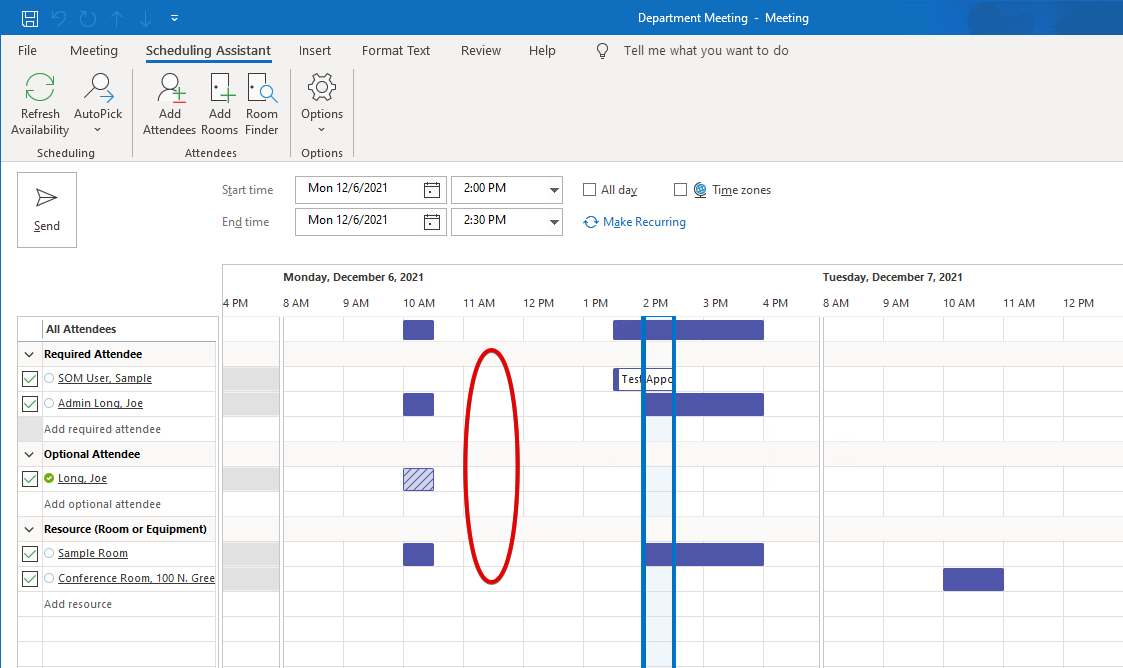
Now we can see all attendees and their availability, as well as the availability of the rooms we’ve selected. We can see in this example that our original time of 2 pm won’t work. We can change it to 11 am by clicking that time (anywhere in the red circle below).
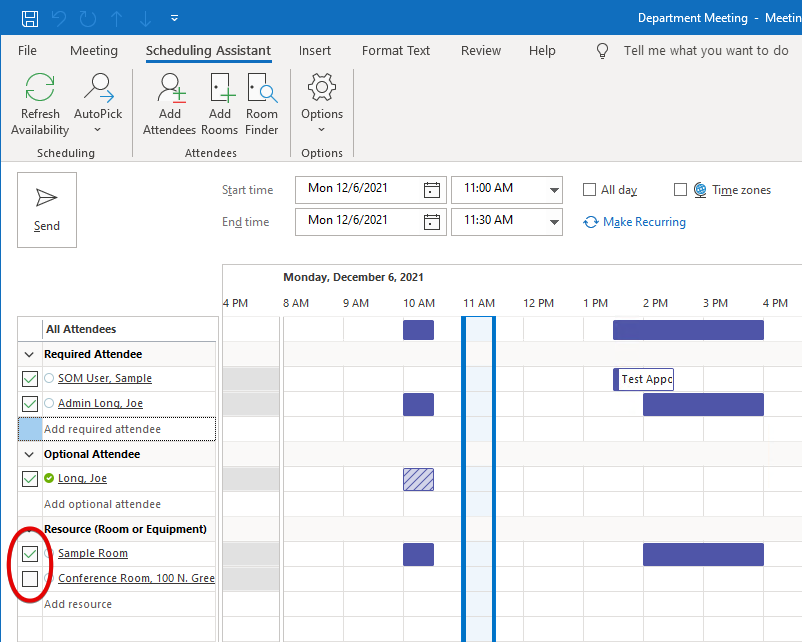
Now that I’ve moved the time, I can see that either of these rooms are available at that time. I will uncheck all rooms except for the one I’d like to use.
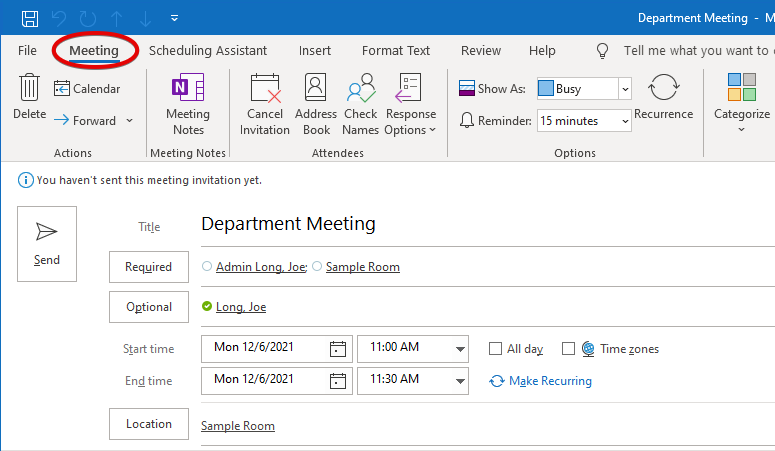
Now we’ll click Meeting in the top menu and go back to the event’s details. Our new time and room are shown here. We can now send our meeting to the other participants.
How do I use the Room Finder?
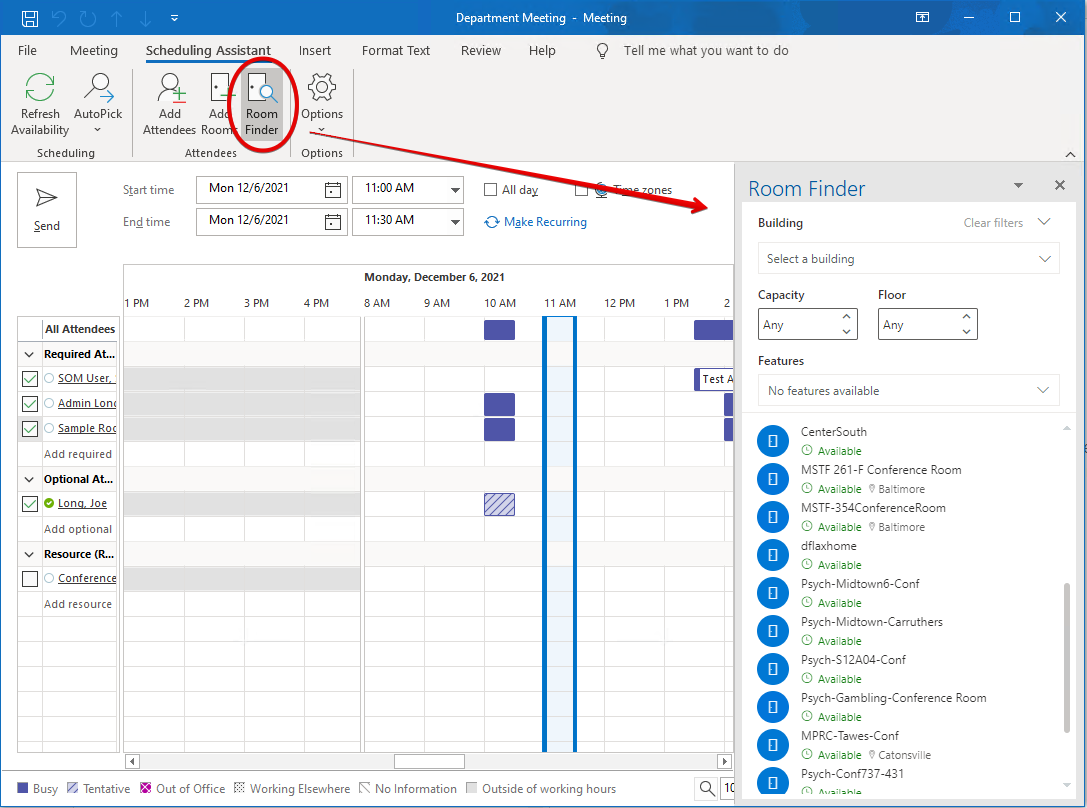
The Room Finder is a feature in Outlook that will use your location and your recently used rooms to make suggestions, and will also list all rooms on campus. You’ll see buttons to access the Room Finder in multiple places.

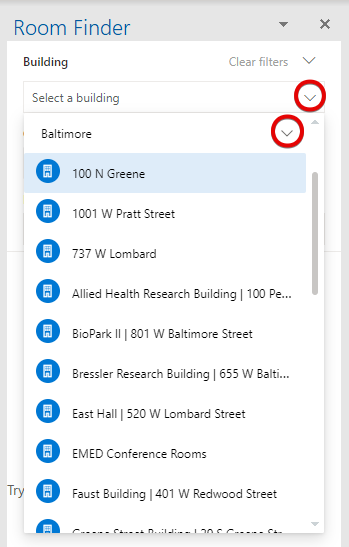
The Room Finder will open a pane on the right side with suggestions.
Click the arrow next to Select a building, and then expand Baltimore. You’ll see lists broken down by building.
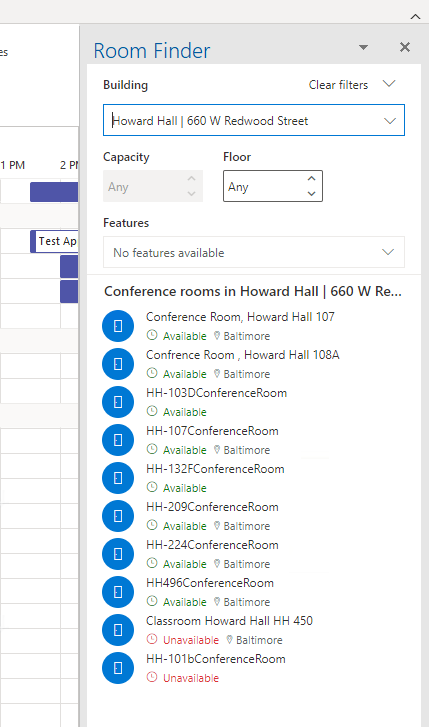
Here I’ve chosen Howard Hall. I can see all rooms in that building. We can also see each room’s availability for the time of the meeting.
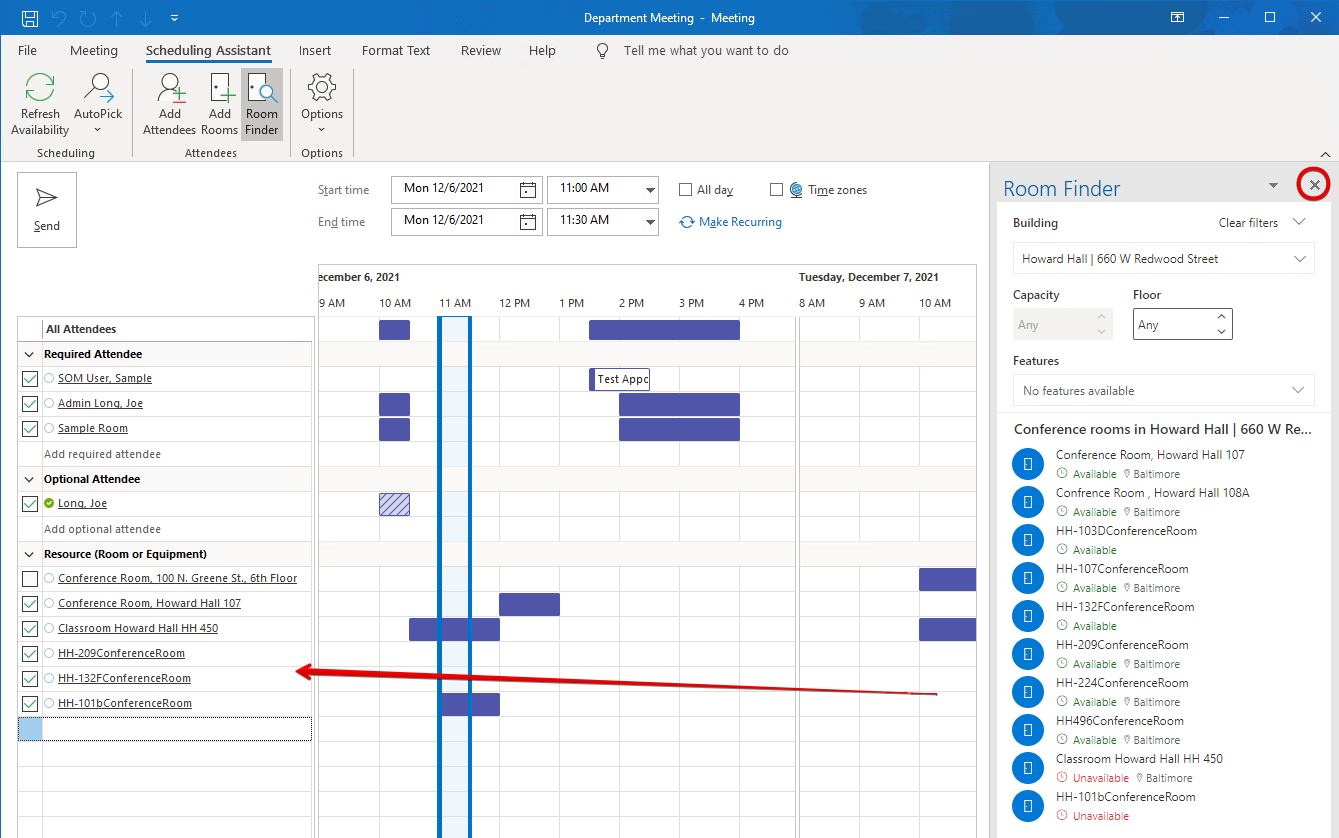
Here in the Scheduling Assistant view, clicking once on any of these rooms will add them to our chart. Now we have a good visual layout of each attendee’s and room’s availability and can make the best choice. When we are done with the Room Finder, we can simply close the pane by clicking on the X in the upper right-hand corner.
How do I set up booking options in a Room that I manage?
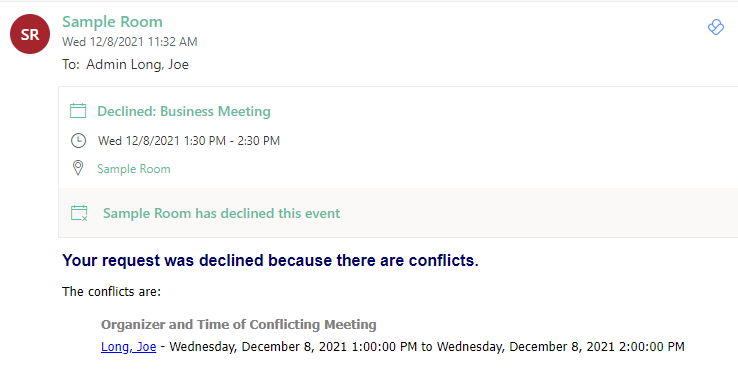
By default, a room will automatically accept any meeting request, unless it is unavailable at that time. If you do submit a room request when it is unavailable, you will receive a declination email.
There are many more options available in a room workflow. First, open your mailbox in Outlook in a browser.
Next, click on your profile icon and click Open another mailbox.
Search for your room and click Open.
You can see that the room mailbox has opened in a new tab (red) while your user mailbox is also open (green). Any changes you make in this new tab will apply to the room mailbox instead of your own.
Click on the gear icon in the upper right, and then click on View all Outlook settings.
Now go to Calendar and Resource Scheduling. This option only appears for room mailboxes.
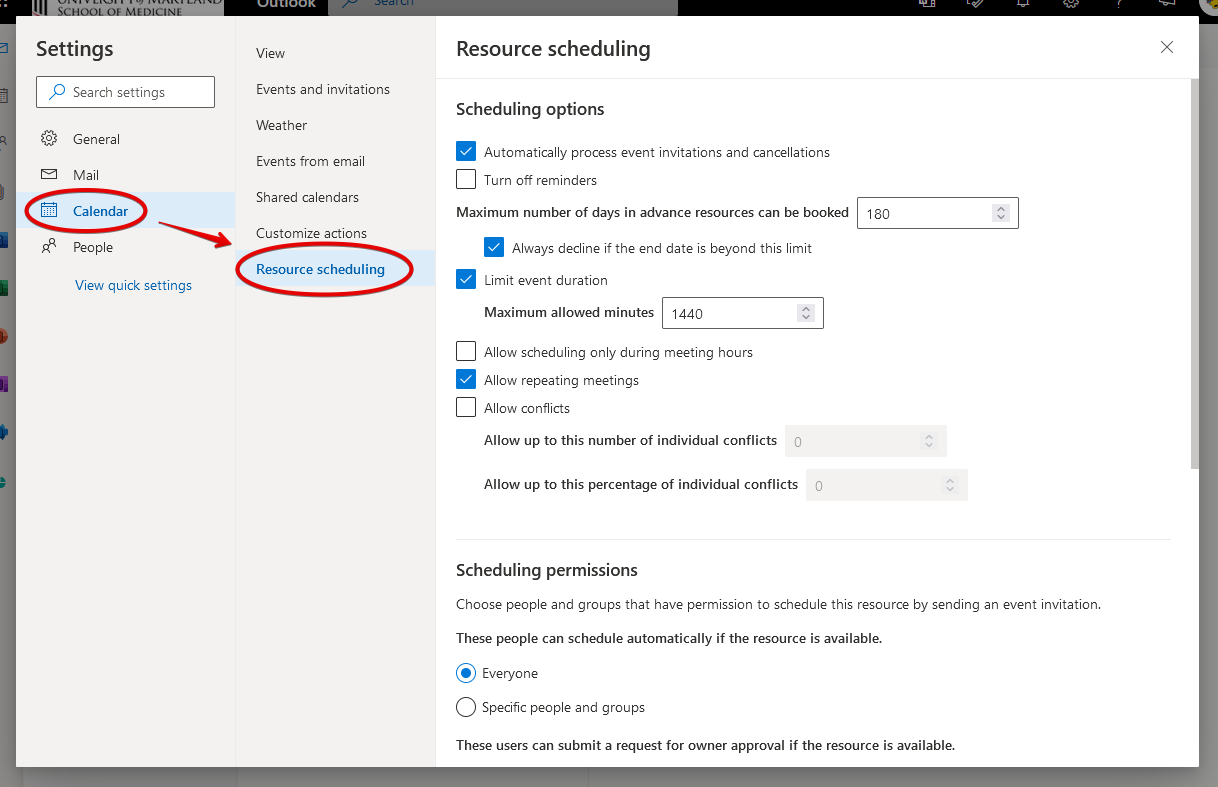
The first set of options all relate to automatic approval. If the first box is checked, then everything inside this red box will apply.
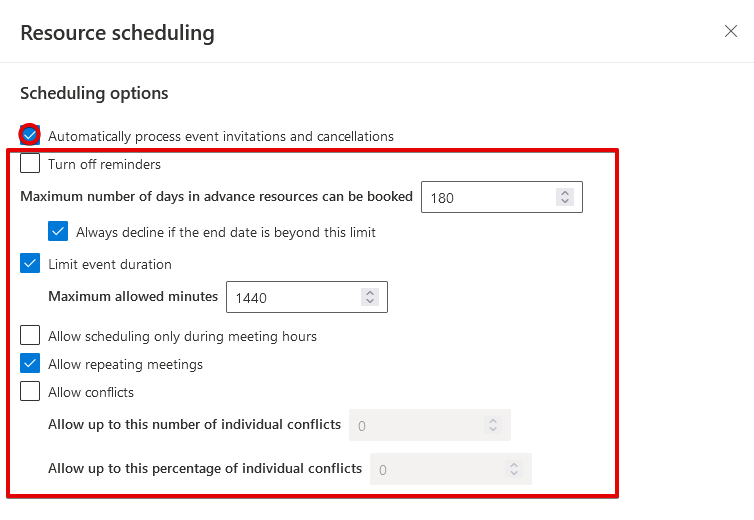
Most of these settings are self-explanatory. The ‘meeting hours’ referred to can be set here, in Calendar > View. If your room is only available between certain times of the day, set that here.

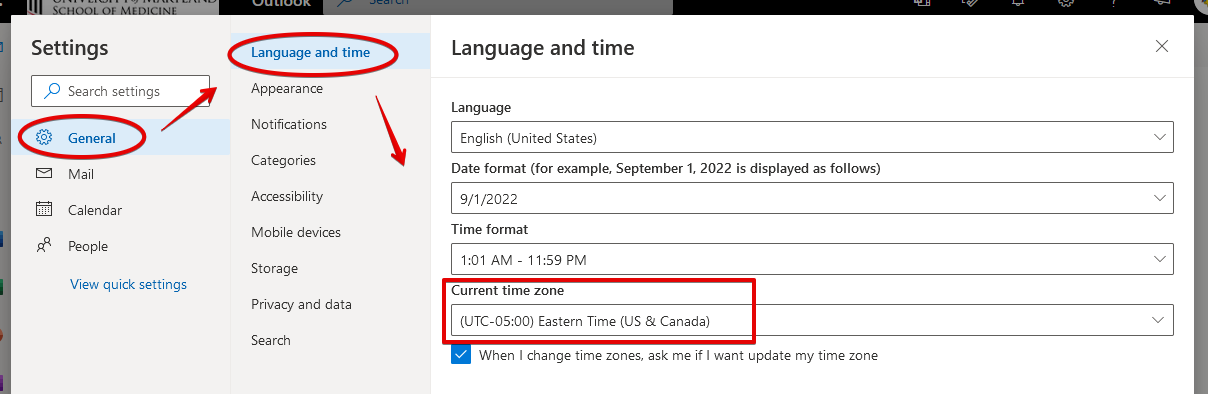
Make sure your time zone is set correctly! If it is listed incorrectly, change it in General > Language and time.
Back to the Resource scheduling options, if we were to uncheck that very first box labeled Automatically process event invitations and cancellations, then we need to specify permissions. Scroll down to see the Scheduling permissions.
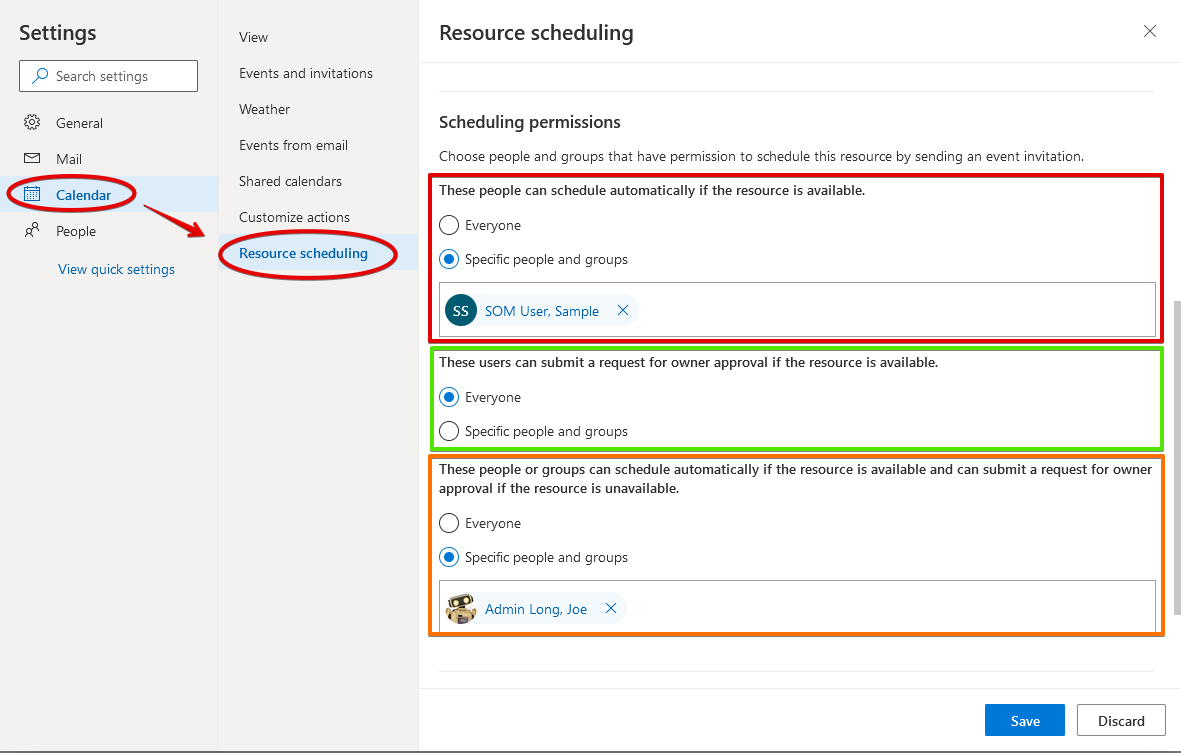
For each permission, you can assign everyone or specific people or groups. In the scenario above, everyone can submit a request, which must be approved by the room owners (green box). Our sample user can schedule the room automatically, without approval (red box). Finally, our Admin account can schedule the room automatically, and can even submit a request for approval if the room is unavailable (orange box). This last option might be assigned to your department chair and their assistants, where their need for a room may override any existing meetings.
Finally, if we scroll all the way down, we have the option to set a Response message. This applies whether automatic approval is enabled or not. This could include general information, reminders, contact info, or anything else.

I am a booking delegate. How do I approve a request?
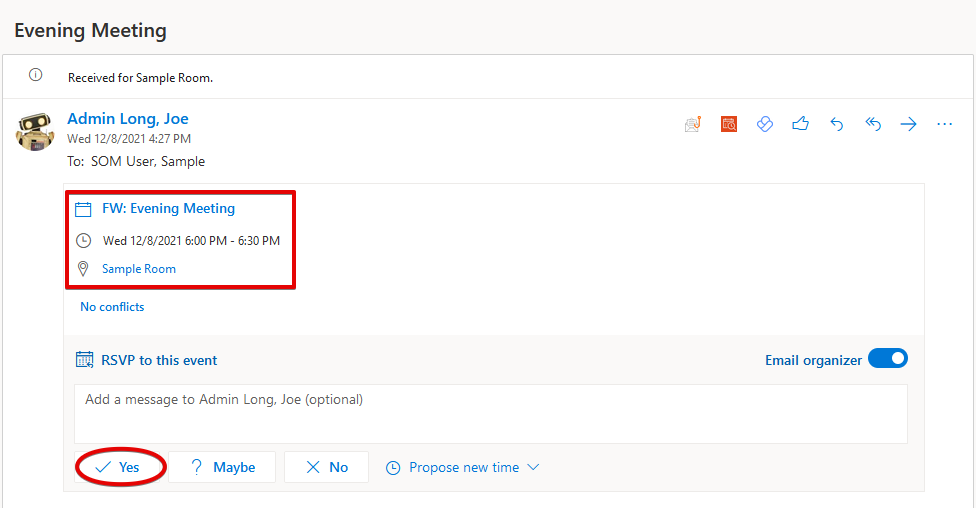
When a room is requested, you will receive an email like the one below. It will include all pertinent information. You can approve, deny, mark as tentative, or propose a new time. You can also add a custom message to the requestor.
How do I add or remove booking delegates?
Booking delegates can only be added or removed by a member of IT Support. Contact the SOM Helpdesk or your department-specific IT team.
What is an equipment resource?
An equipment resource is nearly identical to a room resource. It is used to track the availability of things like vehicles, microscopes, audio/video equipment, and any other type of equipment a department may share. Everything works exactly as shown above. The only difference you’ll see is that an equipment resource will lack a few room-specific fields, such as capacity.
Outlook for Mac
In this article [jump to a section]:
What is a room?
A room is a shared resource meant for many people to access the same information, primarily the calendar of a conference room or other meeting space. It is similar to a , but with key differences. Whereas a shared calendar is usually only visible to a specific team, a room calendar is generally open to anyone. Events are placed directly, or “live” on a shared calendar, whereas a room is used as the location for an event, but the event “lives” on the meeting organizer’s calendar.
Room calendars also include booking options, which can range from an automatic reply with information about the room, to approving or rejecting meetings based on availability or time of day.
How do I book a room?
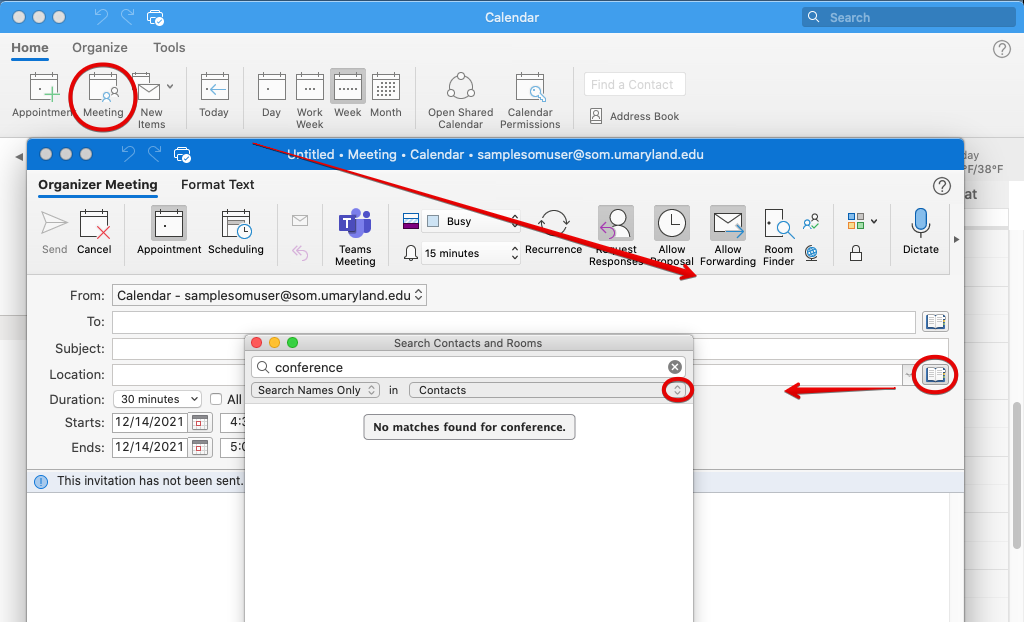
Create a new meeting. Click the address book icon to the right of Location. An address book window will appear. Make sure the address book is set to Meeting Rooms.
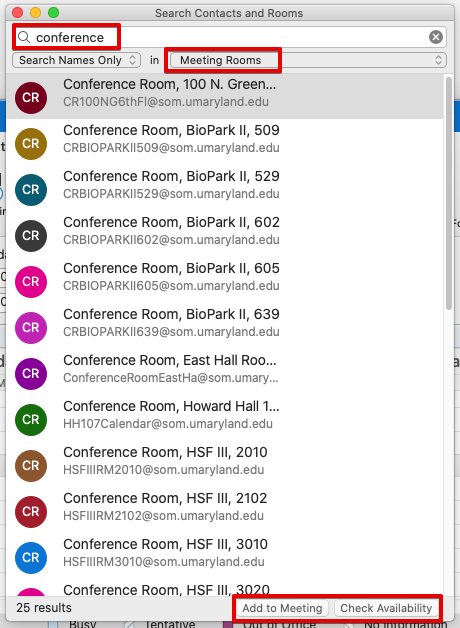
Now you can search for a room. Select one and click the Add to Meeting button at the bottom. You can also Check Availability, which will add the room in the Scheduling Assistant, which is covered in the section How do I check a room’s availability?
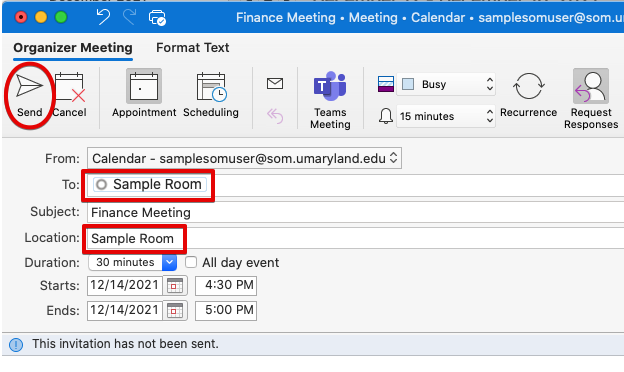
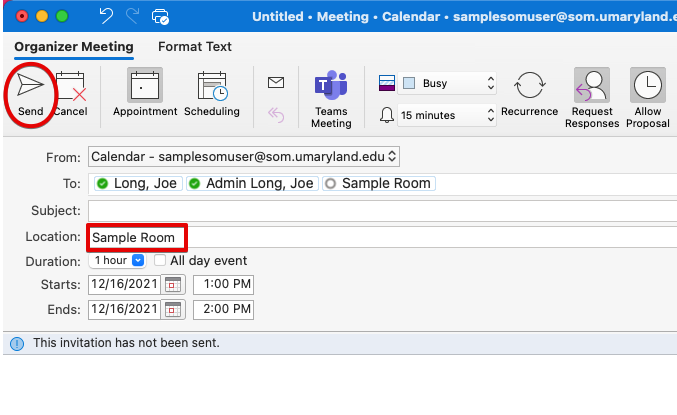
You can see our room is added to the Location field. It also appears in the To field. That's okay, because a copy of the email is in fact being sent to that mailbox, in some cases for approval. Click Send once you're done.
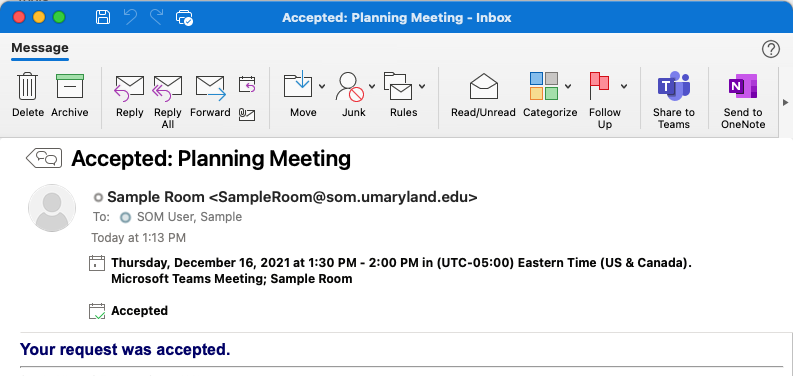
By default, rooms are set to automatically accept any request. Within moments, you should receive an email like this.
How do I check a room’s availability?
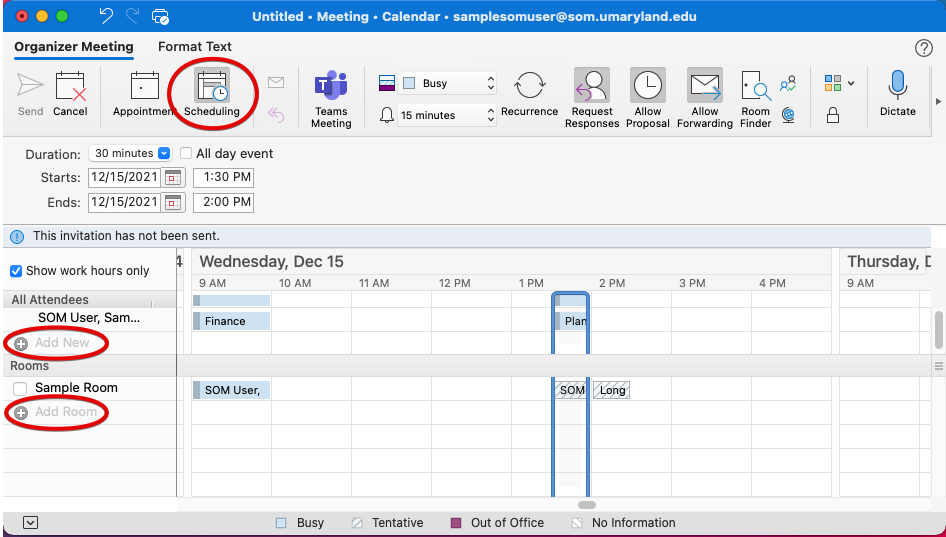
The best way to check a room’s availability is with the Scheduling Assistant. Create a new meeting in Outlook. Fill in the title, time and participants if you wish, though you can do this later. Click on Scheduling in the top menu. Now you’ll see a chart, including a list of any attendees you included already. You can also add more by clicking Add New.
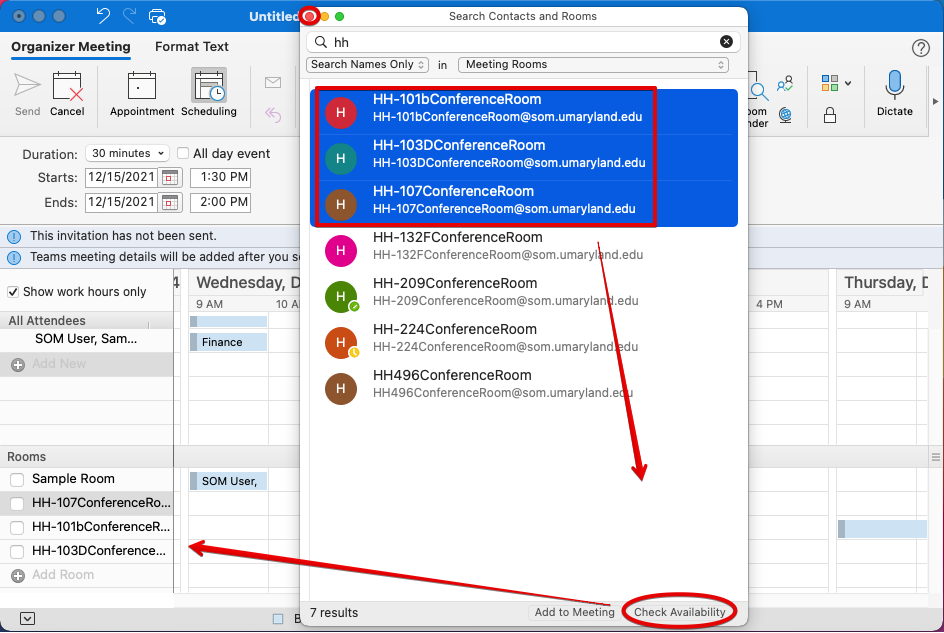
If you've used any rooms lately, they will be included here automatically. To add more rooms, click Add Room on the left. Search for more rooms here. You can select multiple rooms to see their availability and choose the best one for your event. Here, I've selected a few rooms in Howard Hall, and added them to the Scheduling Assistant by clicking Check Availability. We'll close this window when we're done adding rooms.
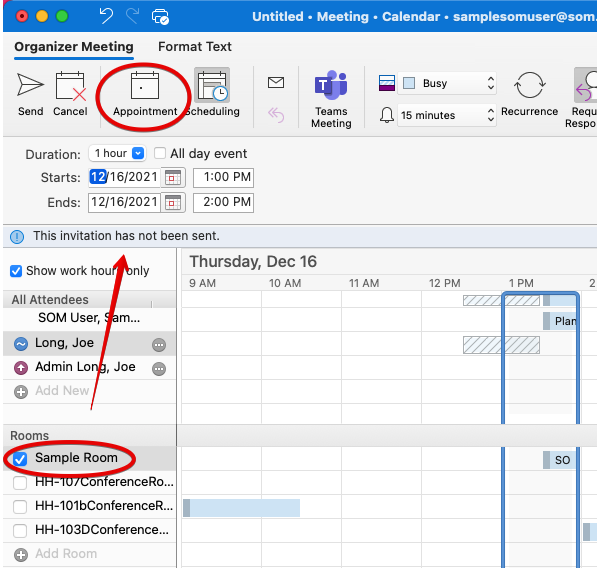
Now we can see all attendees and their availability, as well as the availability of the rooms we’ve selected. The arrow points to our meeting time, which we can drag to move around or extend. When we've decided on a room, we can check the box next to it.
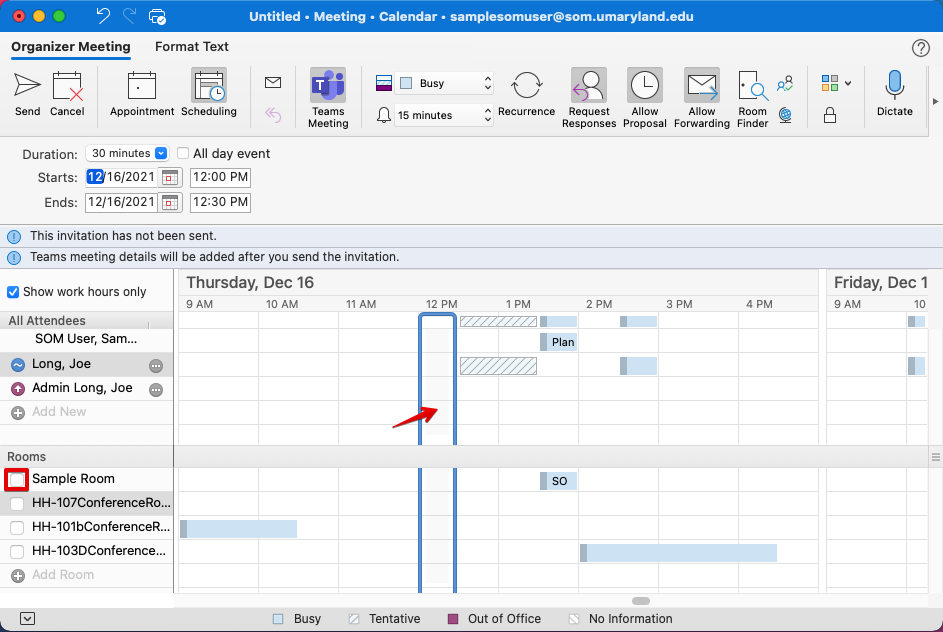
I'll check the room I want, and then click Appointment at the top to go back to the regular Meeting page.
You can see that our room has been added to the meeting. Now we can send the invite request to our other participants.
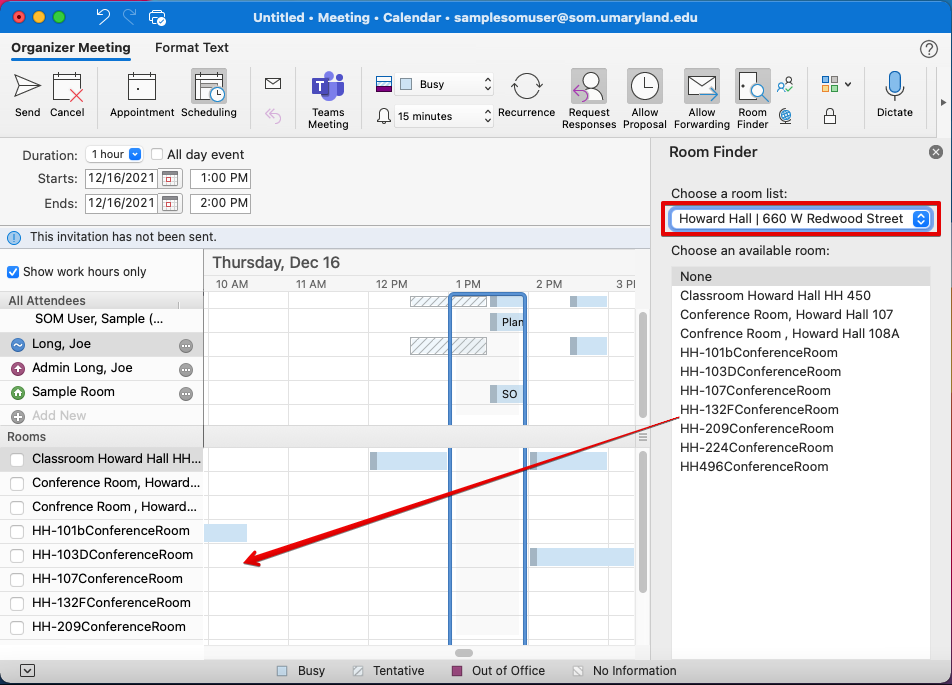
How do I use the Room Finder?
The Room Finder is a feature in Outlook that will use your location and your recently used rooms to make suggestions, and will also list all rooms on campus. You’ll see buttons to access the Room Finder in multiple places. Click it here at the top of a new meeting. It will automatically switch you to Scheduling Assistant view if you're not already there, and it will open this pane on the right.
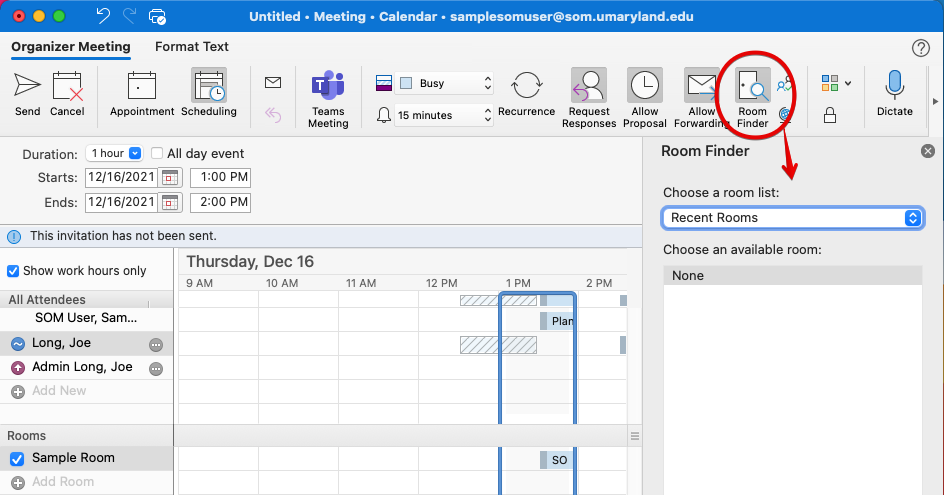
Click the arrow next to Recent Rooms to get a list of all buildings on campus.
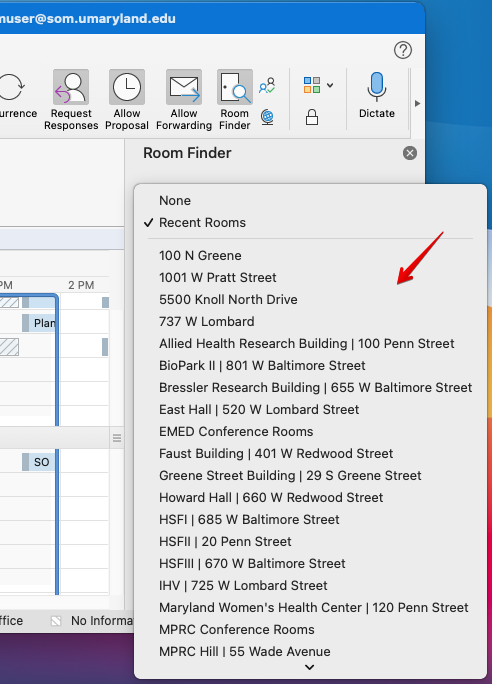
Here I've selected Howard Hall. You can see how all of the rooms in this building are automatically added to the Scheduling Assistant view. Now we have a good visual layout of each attendee’s and room’s availability and can make the best choice. As shown in the previous section, check the box next to the room that you'd like to use. When we are done with the Room Finder, we can simply close the pane by clicking on the X in the upper right-hand corner.
How do I set up booking options in a Room that I manage?
By default, a room will automatically accept any meeting request, unless it is unavailable at that time. If you do submit a room request when it is unavailable, you will receive a declination email.
There are many more options available in a room workflow. First, open your mailbox in Outlook in a browser.
Next, click on your profile icon and click Open another mailbox.
Search for your room and click Open.
You can see that the room mailbox has opened in a new tab (red) while your user mailbox is also open (green). Any changes you make in this new tab will apply to the room mailbox instead of your own.
Click on the gear icon in the upper right, and then click on View all Outlook settings.
Now go to Calendar and Resource Scheduling. This option only appears for room mailboxes.
The first set of options all relate to automatic approval. If the first box is checked, then everything inside this red box will apply.
Most of these settings are self-explanatory. The ‘meeting hours’ referred to can be set here, in Calendar > View. If your room is only available between certain times of the day, set that here.
Make sure your time zone is set correctly! If it is listed incorrectly, change it in General > Language and time.
Back to the Resource scheduling options, if we were to uncheck that very first box labeled Automatically process event invitations and cancellations, then we need to specify permissions. Scroll down to see the Scheduling permissions.
For each permission, you can assign everyone or specific people or groups. In the scenario above, everyone can submit a request, which must be approved by the room owners (green box). Our sample user can schedule the room automatically, without approval (red box). Finally, our Admin account can schedule the room automatically, and can even submit a request for approval if the room is unavailable (orange box). This last option might be assigned to your department chair and their assistants, where their need for a room may override any existing meetings.
Finally, if we scroll all the way down, we have the option to set a Response message. This applies whether automatic approval is enabled or not. This could include general information, reminders, contact info, or anything else.
I am a booking delegate. How do I approve a request?
When a room is requested, you will receive an email like the one below. It will include all pertinent information. You can approve, deny, mark as tentative, or propose a new time. You can also add a custom message to the requestor.
How do I add or remove booking delegates?
Booking delegates can only be added or removed by a member of IT Support. Contact the SOM Helpdesk or your department-specific IT team.
What is an equipment resource?
An equipment resource is nearly identical to a room resource. It is used to track the availability of things like vehicles, microscopes, audio/video equipment, and any other type of equipment a department may share. Everything works exactly as shown above. The only difference you’ll see is that an equipment resource will lack a few room-specific fields, such as capacity.
Outlook in a browser
In this article [jump to a section]:
What is a room?
A room is a shared resource meant for many people to access the same information, primarily the calendar of a conference room or other meeting space. It is similar to a shared mailbox, but with key differences. Whereas a shared calendar is usually only visible to a specific team, a room calendar is generally open to anyone. Events are placed directly, or “live” on a shared calendar, whereas a room is used as the location for an event, but the event “lives” on the meeting organizer’s calendar.
Room calendars also include booking options, which can range from an automatic reply with information about the room, to approving or rejecting meetings based on availability or time of day.
How do I book a room?
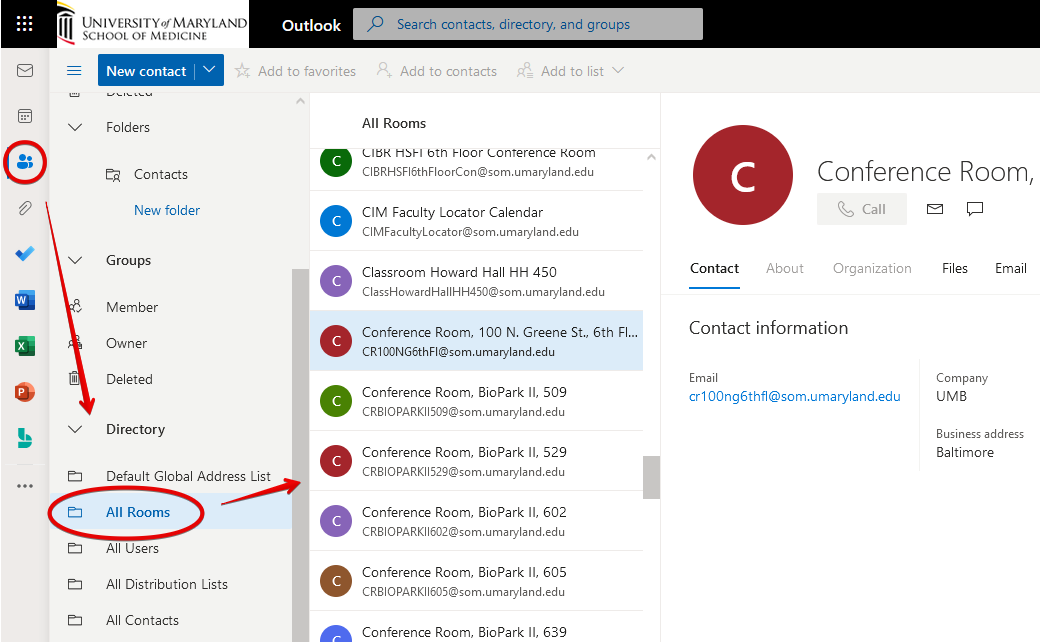
Go to Contacts pane by clicking on the icon to the left, scroll down under Directory and click on All Rooms. Find the room you'd like to use and take note of the name.
Now, go to your Calendar pane, create a New Event, and begin typing in the name of your room until it auto-populates.
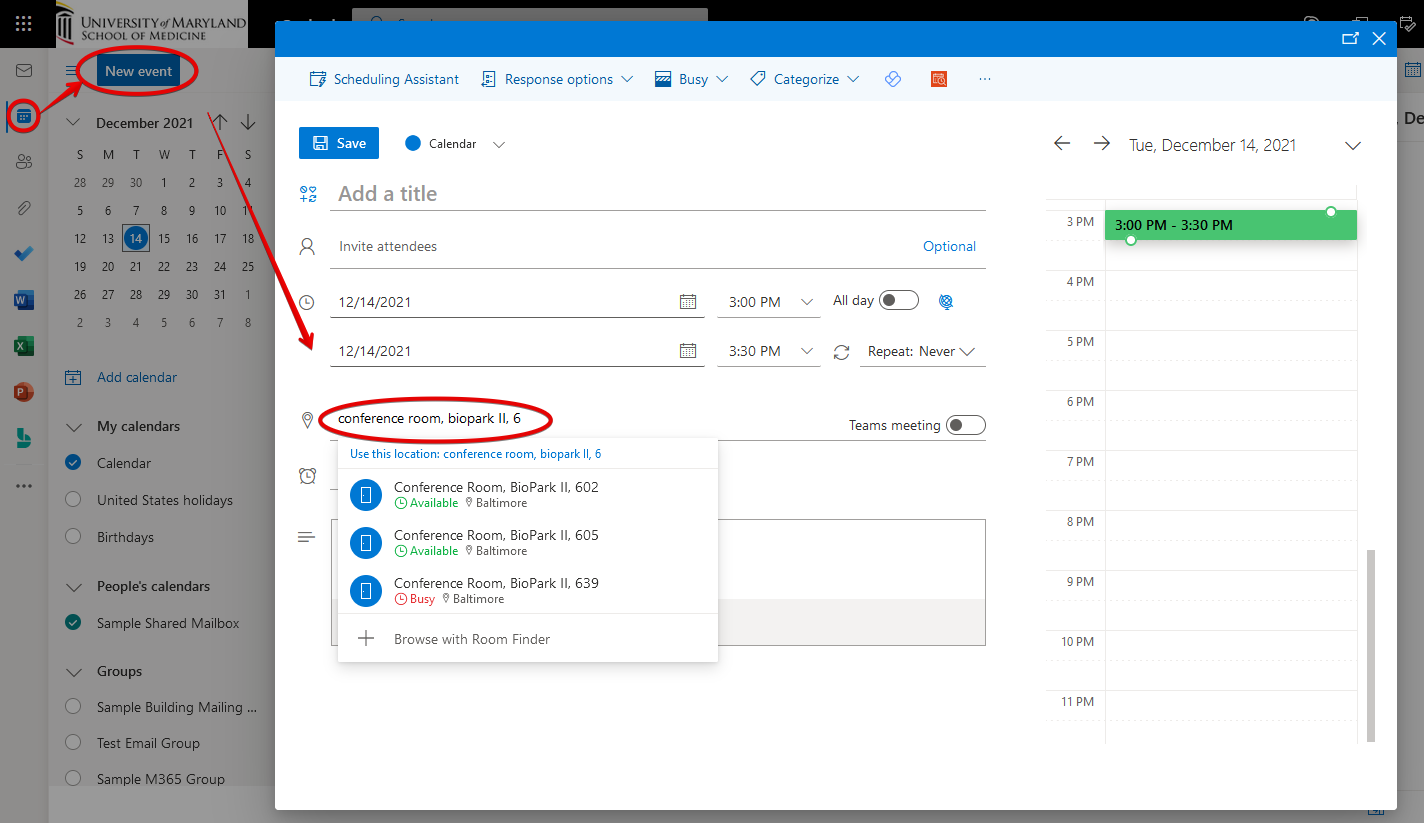
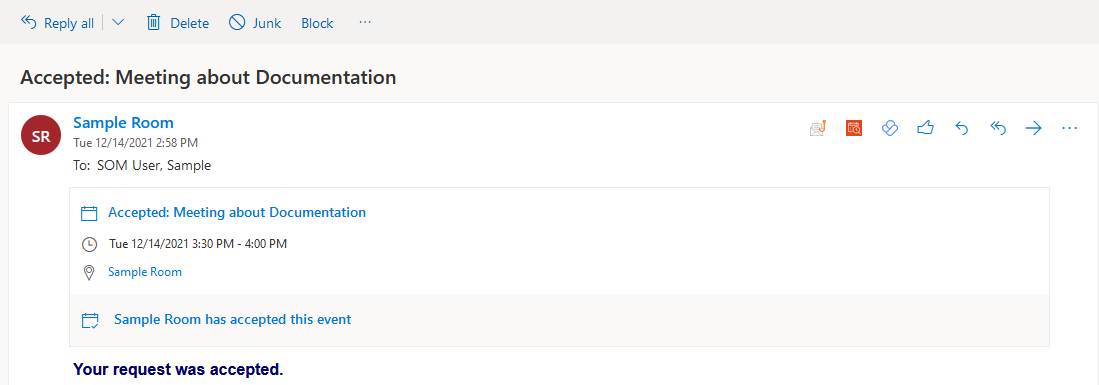
Invite the rest of your attendees, and set the title, time, and description like you would any other event. By default, rooms are set to automatically accept any request. Within moments, you should receive an email like this.
How do I check a room’s availability?
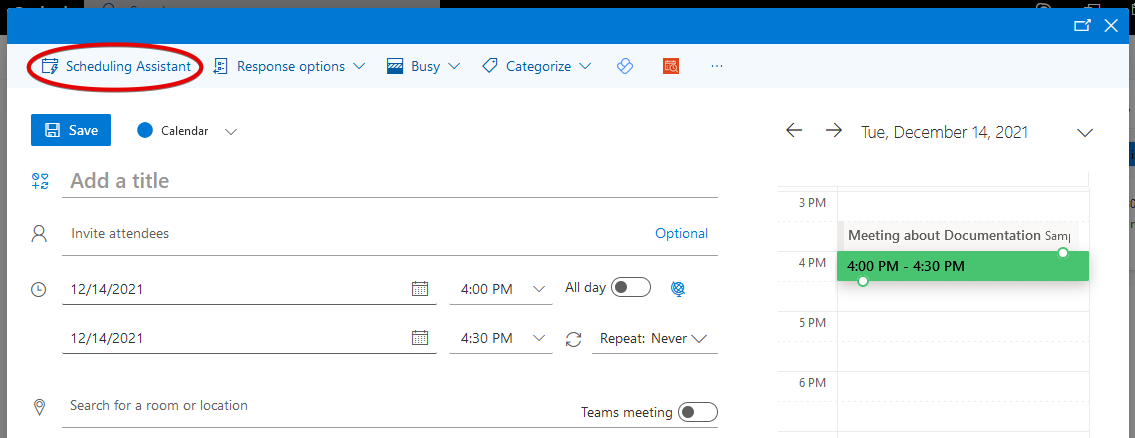
The best way to check a room’s availability is with the Scheduling Assistant. Create a new event. Fill in the title, time and participants if you wish, though you can do this later. Click on Scheduling Assistant in the top menu.
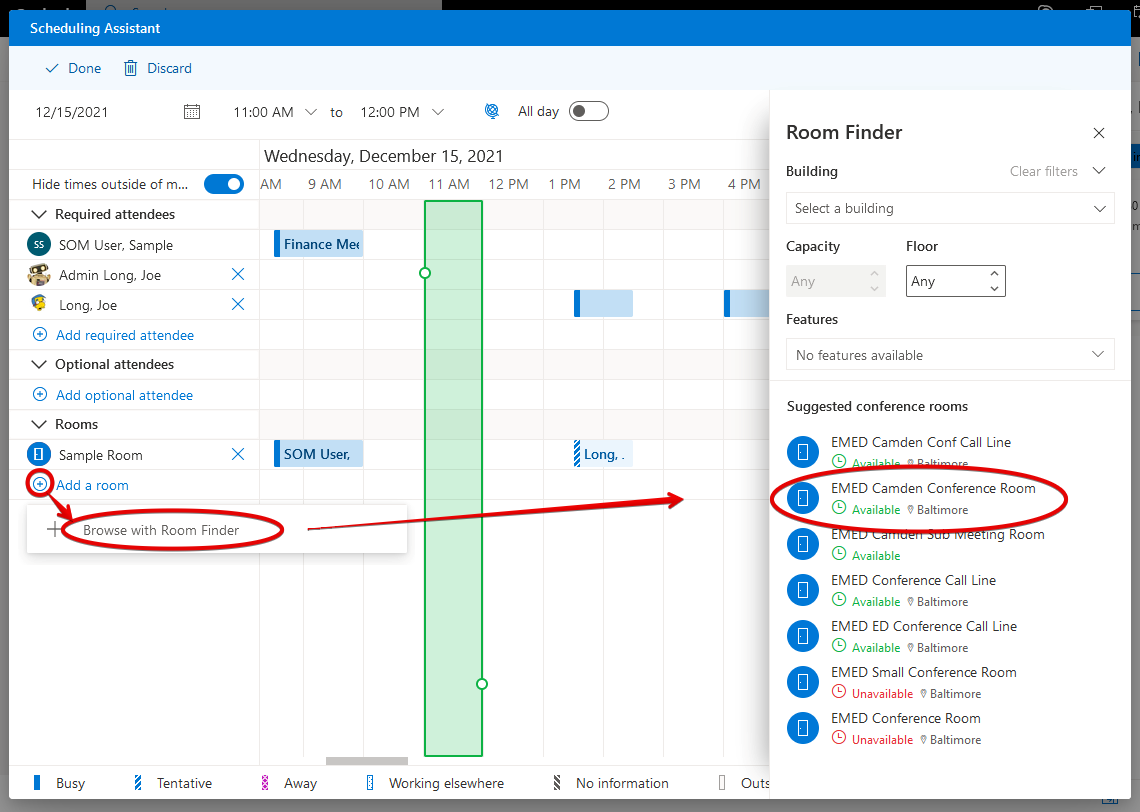
Now you’ll see a chart, including a list of any attendees you included already. You can also add more. To add rooms, click Add a Room in the top menu. Recently selected rooms will appear here. You can click Room Finder to find more. For more on the Room Finder, jump to How do I use the Room Finder?
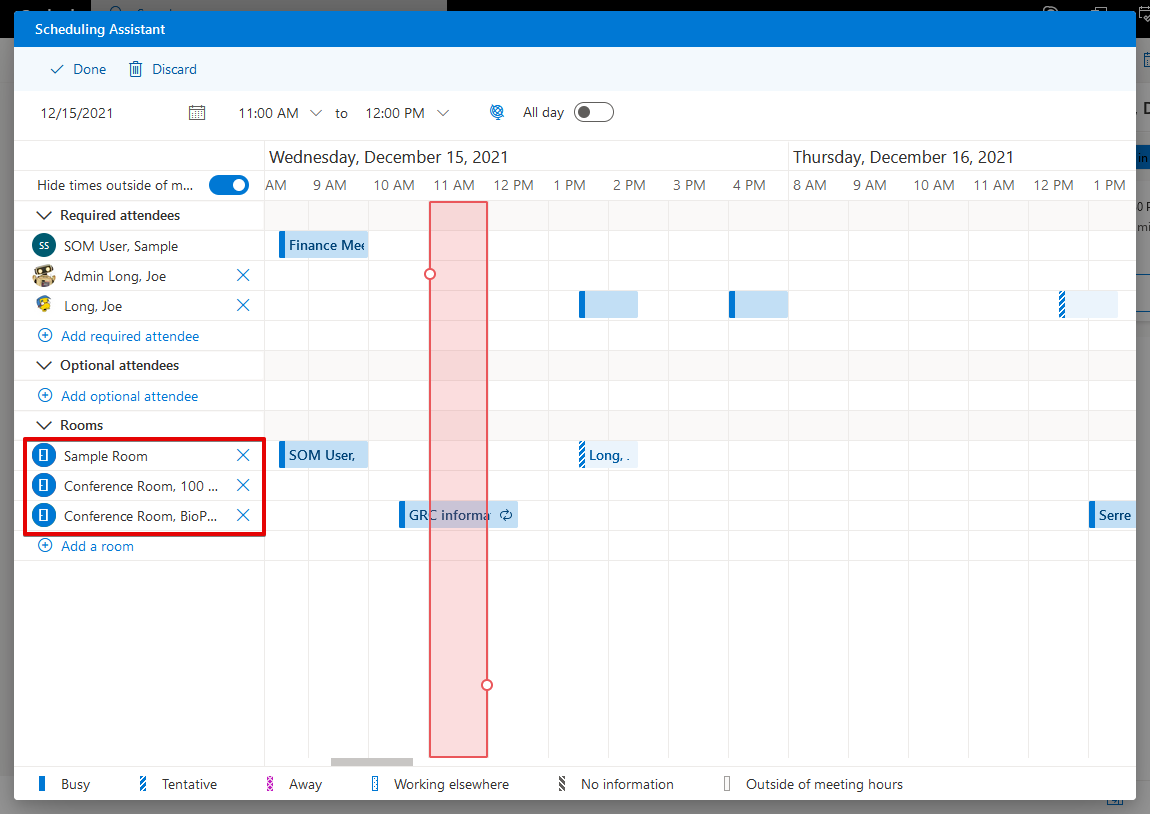
Now we can see all attendees and their availability, as well as the availability of the rooms we’ve selected. The proposed meeting time will be shown in red if one or more participants or rooms are unavailable. You can move the time by dragging it left or right.
Here, I've dragged my time to 12 pm. I've also closed all conference rooms except for the one I want by clicking on the X next to them. Our meeting time is now shown in green. To finish up, click Done.
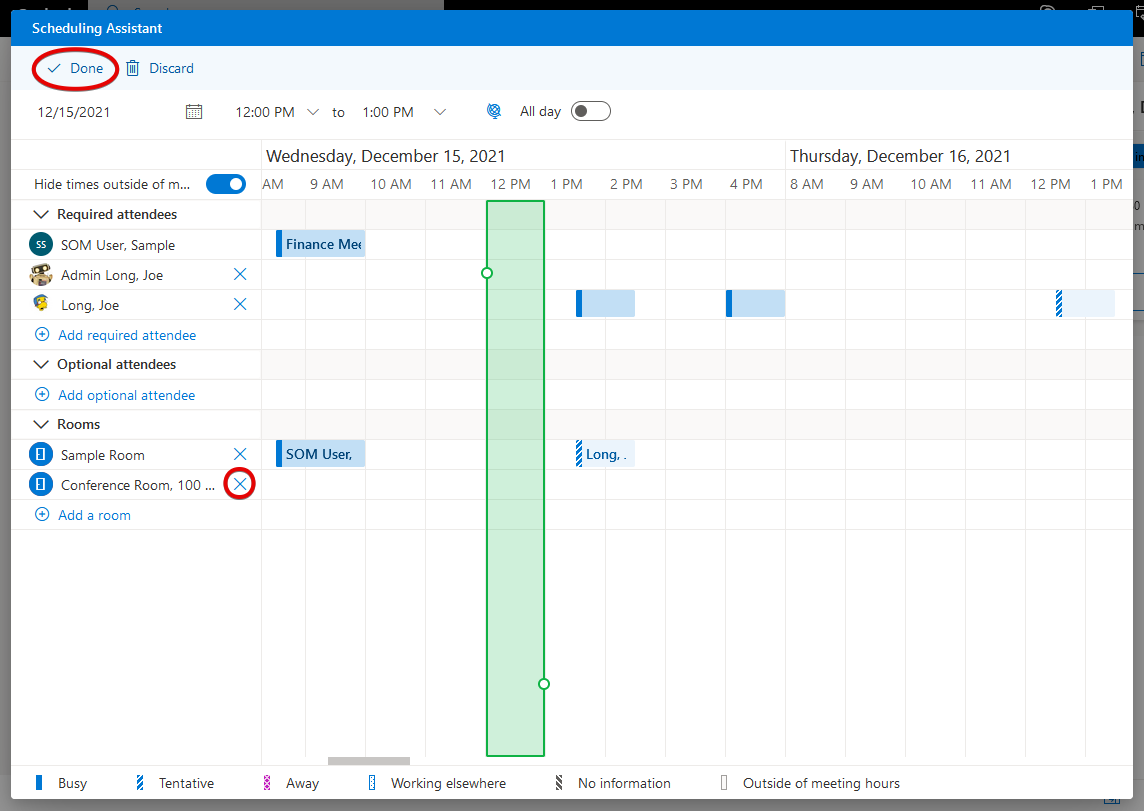
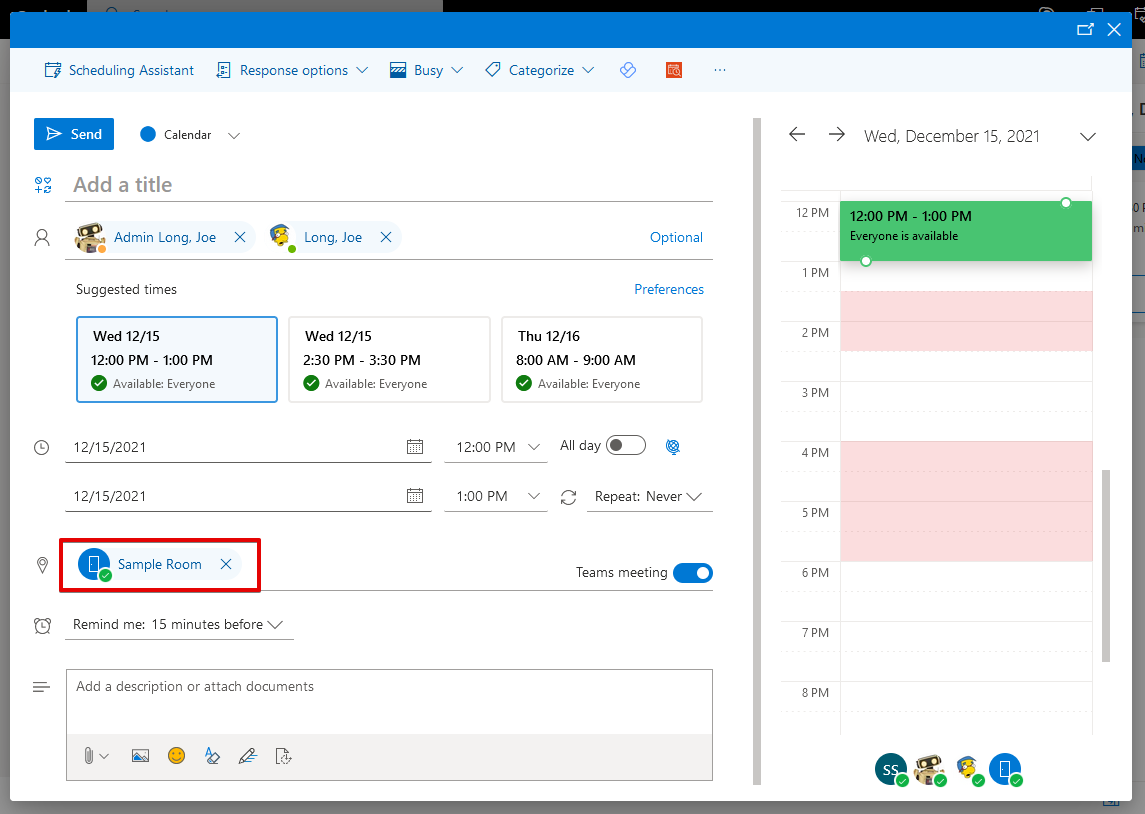
That returns us to the event window, where we can make any final changes before sending to the other participants. We can see here that the room we chose is shown as the location.
How do I use the Room Finder?
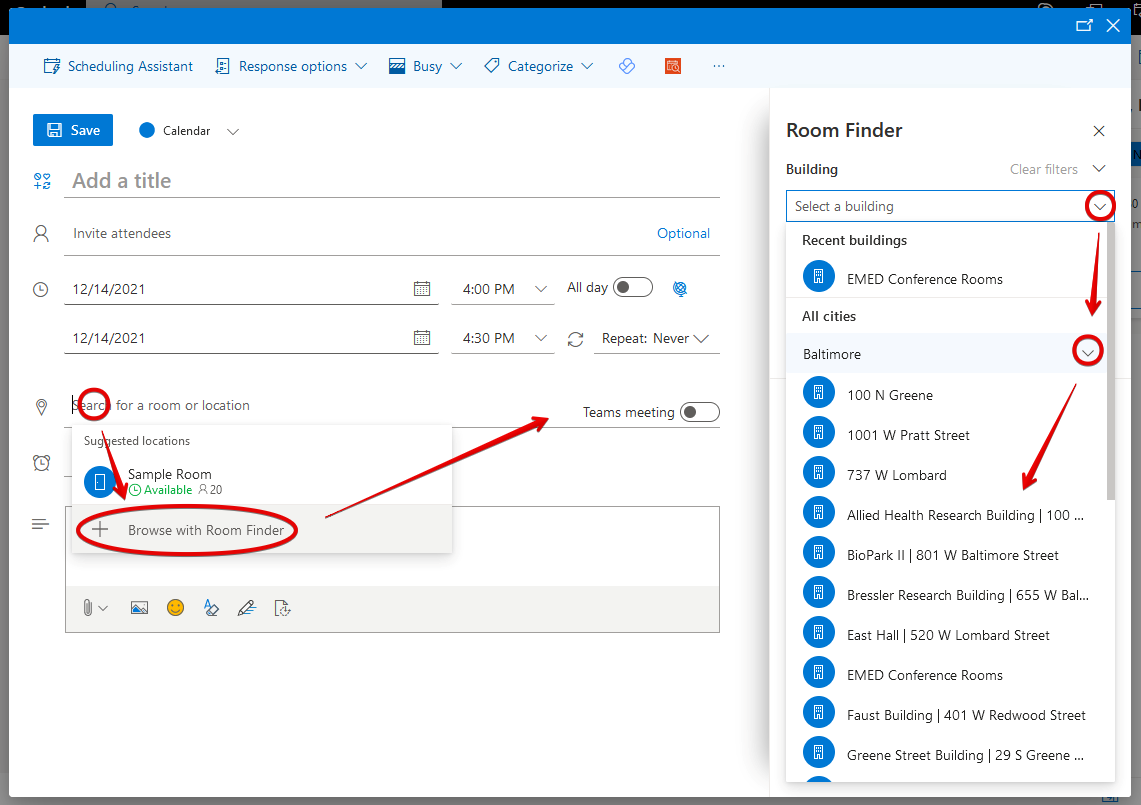
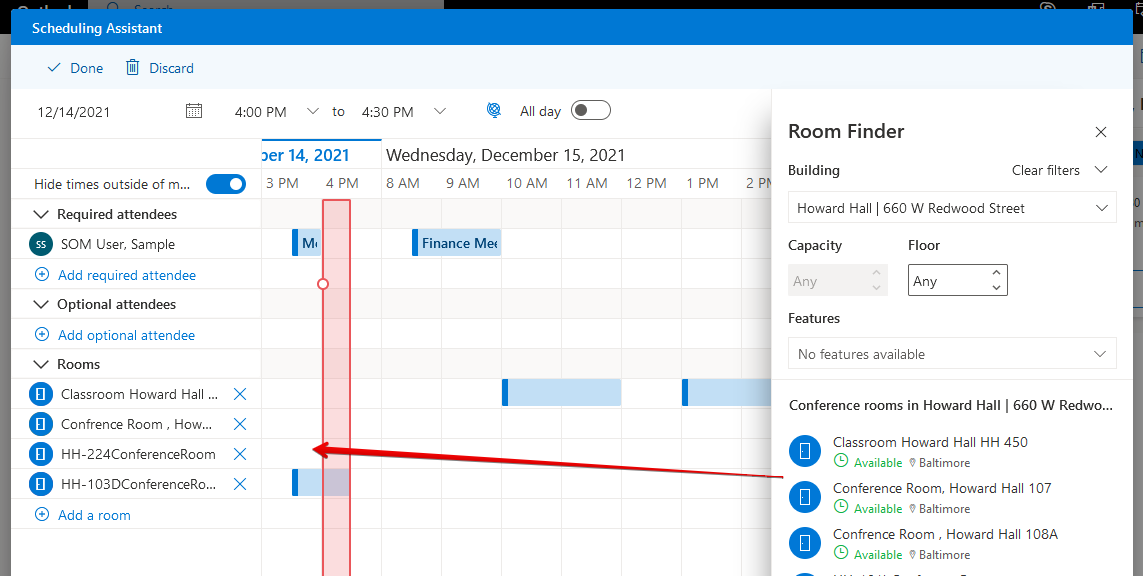
The Room Finder is a feature in Outlook that will use your location and your recently used rooms to make suggestions, and will also list all rooms on campus. When adding a room, click Browse with Room Finder. A pane will open up on the right. Rooms are first broken down by city, and then by building. Choose Baltimore, and then choose a building.
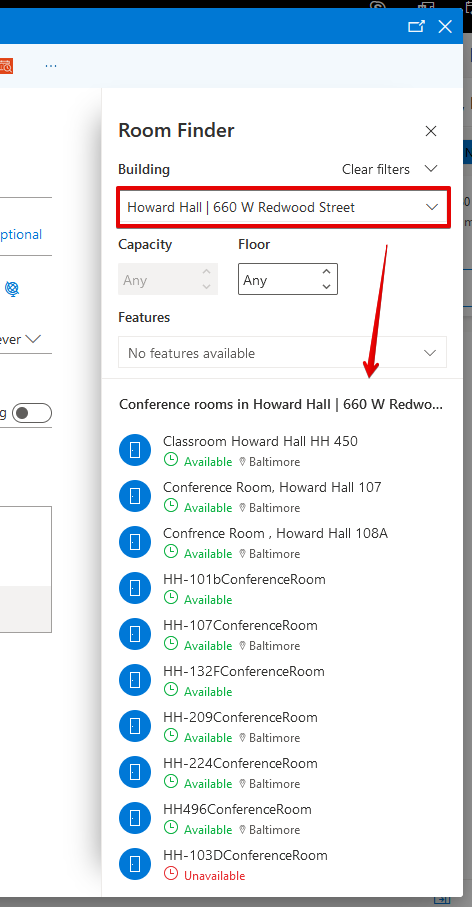
Here I’ve chosen Howard Hall. I can see all rooms in that building. We can also see each room’s availability for the time of the meeting.
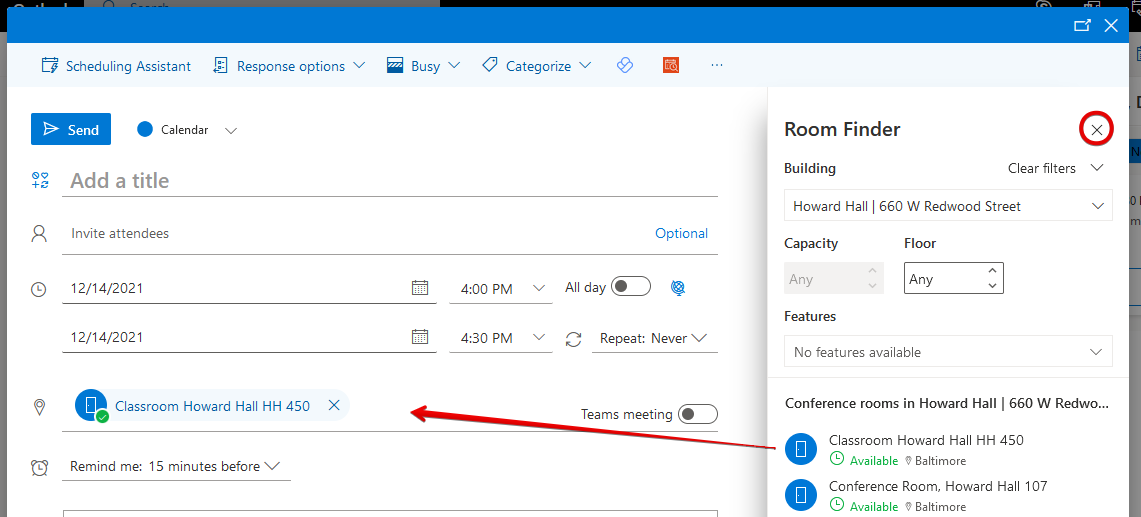
Clicking once on any of these rooms will add them to our chart. When we are done with the Room Finder, we can simply close the pane by clicking on the X in the upper right-hand corner.
When using the Room Finder in the Scheduling Assistant, you can use it to add multiple rooms to easily see their availability.
How do I set up booking options in a Room that I manage?
By default, a room will automatically accept any meeting request, unless it is unavailable at that time. If you do submit a room request when it is unavailable, you will receive a declination email.
There are many more options available in a room workflow. First, open your mailbox in Outlook in a browser.
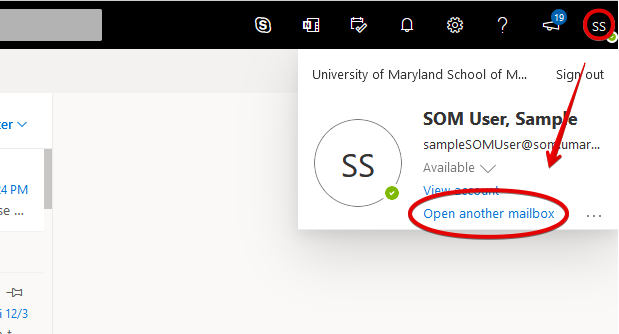
Next, click on your profile icon and click Open another mailbox.
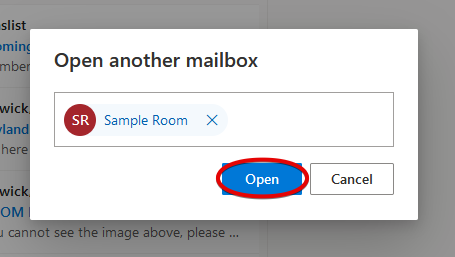
Search for your room and click Open.
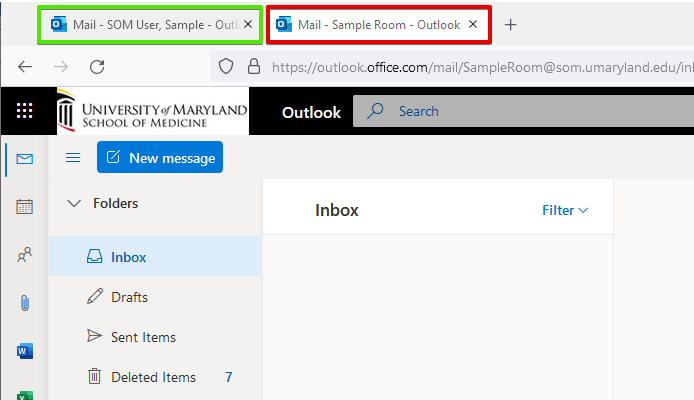
You can see that the room mailbox has opened in a new tab (red) while your user mailbox is also open (green). Any changes you make in this new tab will apply to the room mailbox instead of your own.
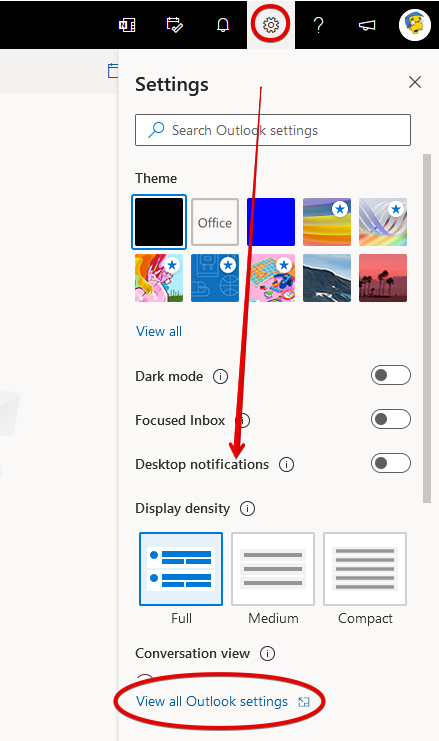
Click on the gear icon in the upper right, and then click on View all Outlook settings.
Now go to Calendar and Resource Scheduling. This option only appears for room mailboxes.
The first set of options all relate to automatic approval. If the first box is checked, then everything inside this red box will apply.
Most of these settings are self-explanatory. The ‘meeting hours’ referred to can be set here, in Calendar > View. If your room is only available between certain times of the day, set that here.
Make sure your time zone is set correctly! If it is listed incorrectly, change it in General > Language and time.
Back to the Resource scheduling options, if we were to uncheck that very first box labeled Automatically process event invitations and cancellations, then we need to specify permissions. Scroll down to see the Scheduling permissions.
For each permission, you can assign everyone or specific people or groups. In the scenario above, everyone can submit a request, which must be approved by the room owners (green box). Our sample user can schedule the room automatically, without approval (red box). Finally, our Admin account can schedule the room automatically, and can even submit a request for approval if the room is unavailable (orange box). This last option might be assigned to your department chair and their assistants, where their need for a room may override any existing meetings.
Finally, if we scroll all the way down, we have the option to set a Response message. This applies whether automatic approval is enabled or not. This could include general information, reminders, contact info, or anything else.
I am a booking delegate. How do I approve a request?
When a room is requested, you will receive an email like the one below. It will include all pertinent information. You can approve, deny, mark as tentative, or propose a new time. You can also add a custom message to the requestor.
How do I add or remove booking delegates?
Booking delegates can only be added or removed by a member of IT Support. Contact the SOM Helpdesk or your department-specific IT team.
What is an equipment resource?
An equipment resource is nearly identical to a room resource. It is used to track the availability of things like vehicles, microscopes, audio/video equipment, and any other type of equipment a department may share. Everything works exactly as shown above. The only difference you’ll see is that an equipment resource will lack a few room-specific fields, such as capacity.